Add a contact form to your website
Add a contact, quote or registration form to WordPress, Wix, Squarespace, Webflow, Shopify or any HTML website by pasting a few lines of code.
You can add a Canard Form form to any website by pasting a few lines of code: contact form, quote request, event registration, job application… Submissions arrive in Canard Form and by email, with no server or plugin to install.
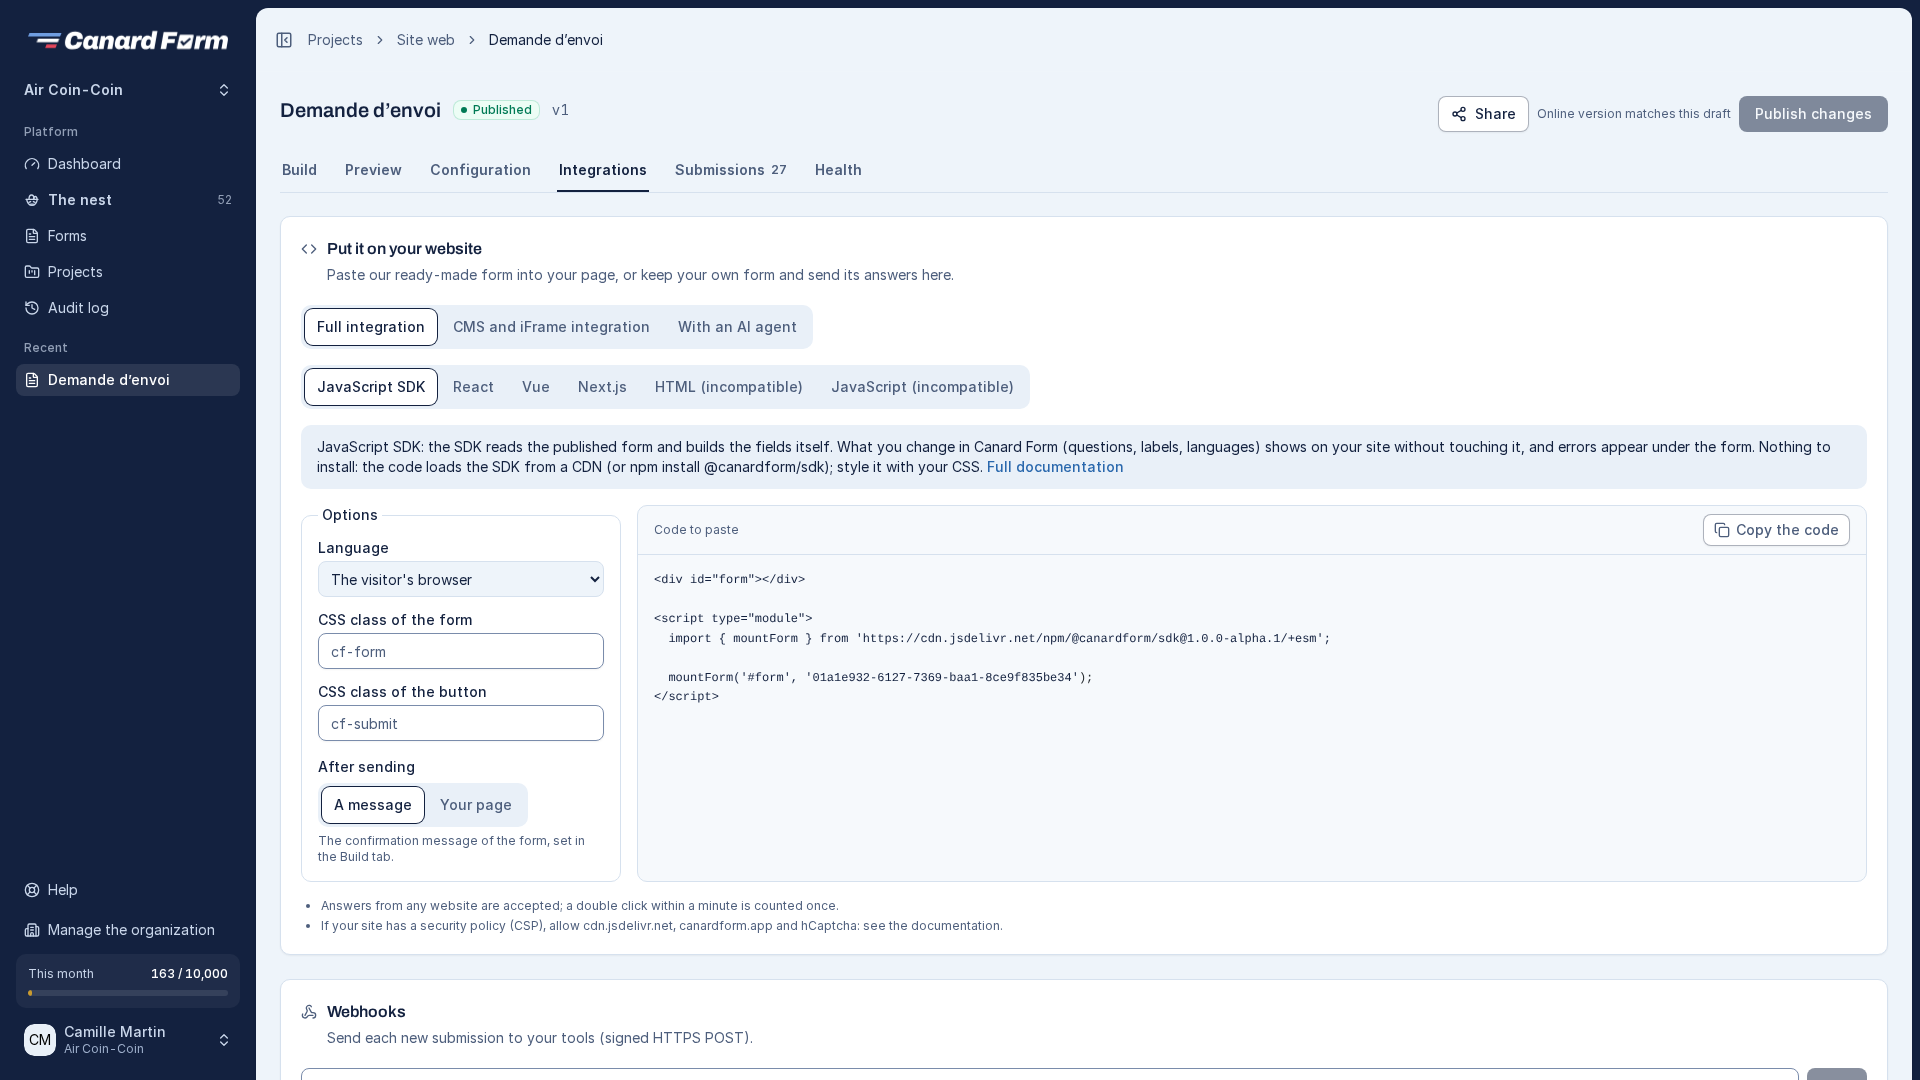
Add a form to an HTML website
For a static website (HTML, Hugo, Jekyll, Eleventy…), the simplest option is the JavaScript SDK: it builds the form right inside your page, with your website's font and width, and you can style it with your CSS.
- Publish the form (see Publish and manage versions).
- Open the Integrations tab. Full integration and JavaScript SDK are selected by default.
- Click Copy the code and paste it inside the page's
<body>, where the form should appear.
<div id="form"></div>

<script type="module">
    import { mountForm } from 'https://cdn.jsdelivr.net/npm/@canardform/sdk@1.0.0-alpha.4/+esm';

    mountForm('#form', 'YOUR_FORM');
</script>
Options (language, CSS classes, thank-you page) and the components for React, Vue, Next.js and Nuxt are described in the developer guide. The code from the Other / HTML option of the CMS integration also works, in an iframe.
Add a form to a CMS
- Publish the form (see Publish and manage versions). A form that was never published can't show on your website.
- Open the Integrations tab, then CMS and iFrame integration.
- Under Your website is made with, pick your tool. The steps and the code adapt.
The code contains your form's address. It looks like this:
<script
    src="https://canardform.app/v1/embed.js"
    data-form="https://canardform.app/v1/f/YOUR_FORM"
    async
></script>
The script shows the form where it is pasted and fits its height to the content, step by step. It also passes your page address parameters (?utm_source=…) to the form, which hidden fields can save. For Wix and Squarespace, the code is a plain <iframe> tag.
Add a form to WordPress
- Open the page or post in the WordPress editor (Gutenberg).
- Click + and add a Custom HTML block where the form should appear.
- Paste the code, then click Update.
With Elementor, use the HTML widget. With Divi, the Code module. No WordPress plugin is needed.
Add a form to Wix
- In the Wix editor, click Add, then Embed code and Embed HTML.
- Choose Code, paste the code and click Update.
- Resize the frame so the whole form is visible, then publish the site.
Wix shows the code in a fixed-size iframe. Allow for the height of the longest form (including its error messages).
Add a form to Squarespace
- Edit the page and add a Code block.
- Paste the code, then save.
Add a form to Webflow
- In the Designer, open the Add panel and drag a Code Embed element onto the page.
- Paste the code from the Other / HTML option, then save and publish the site.
Add a form to Shopify
- Open Online Store → Themes → Customize.
- On the page you want, add a Custom Liquid section.
- Paste the code from the Other / HTML option, then save.
If someone else manages your website, send them the Integrations page: everything they need is there.
What's handled for you
- Automatic updates: every change you publish in Canard Form shows on your website, with no need to paste the code again.
- Mobile display: the form adapts to the width of the page.
- Languages: a form in several languages shows in the visitor's language (see Forms in several languages).
- Spam: the anti-robot check (hCaptcha) is included. It protects your form from bots and spammers.
- Closed form: a disabled or archived form, or one outside its dates, shows your "form closed" message.
- Downtime: if Canard Form can't be reached, a fallback message shows instead of an error page.
Limit the form to your websites
By default, a form can be embedded on any website. To stop someone from copying your embed code onto a website that isn't yours, add your websites in Configuration → General → Allowed websites.
- Add each address exactly as your visitors see it.
example.com,www.example.comandshop.example.comare three different entries: adding one does not allow the others. - Empty list: the form stays allowed everywhere.
- Once a website is listed, the form no longer displays or sends from any other website.
- The page hosted by Canard Form (the form's link, or your custom domain) always works.
Remember your tests. If you test the integration on your computer or on a staging site, also add localhost and that site's address. Otherwise the form stays empty there, or refuses to send with the message "This form cannot be sent from this website".
Some website builders (Wix, for example) display pasted code from a technical address that isn't your website's. If the form disappears after you fill in the list, add that address or empty the list.
This setting stops your integration from being copied in a browser. It is not a spam protection: that is described in Spam protection.
The form doesn't show
- Check that the form is published and online.
- If you filled in the allowed websites, check that the website you are looking at is listed (including
localhostfor a test on your computer). - Check that the whole code was pasted, up to the last tag.
- Some editors don't run scripts in preview: look at the published page.
- If your website sets a Content Security Policy (CSP), allow the addresses listed in the developer guide.
To share the form without a website, just send its link (see Share a link).